
Do it yourself bow
Page 1 of 1

Do it yourself bow
![]() by Nick Thu Mar 26, 2015 9:13 pm
by Nick Thu Mar 26, 2015 9:13 pm

The easiest wood to begin with is red oak, as it's available at any hardware/lumber store. I selected a 1"x3"x8' board with the straightest grain I could find, as well as the widest growth rings and greatest weight relative to other boards in the stack. You will have to dig through the pile, you might need to visit several stores, it's worth it, bad wood, bad bow, bad injuries.
Begin by inspecting the wood, check for any splinters, cracks, knots, if you can work around them great, if not, go get another piece. Slice a inch off one end and then cut a 70 inch portion off, that will leave a 25 inch section.
Take the 70 inch portion and locate and mark the center of each end, snap a line, or use a straight edge to make a line down the plank between these points. Now mark the center of the board. Label the center very clearly. The bow is symmetrical so layout is easy.
The handle is 4 inches long, one inch wide and centered.
The "wedges" are 2 inches long and 2.5 inches wide.
The limbs are 30 inches long and go from the wedges to a width of 3/8ths inches.
Got that? Pretty simple
Cut out the limbs, i made a simple jig and used my table saw, took two seconds. Now thin the board down from the stock size to 7/16ths inch. I used a surface planer, you could use a hand plane (yuck) or a table saw to split the plank to thickness.
Don't cut out the handle area yet.
as is, is too thin, your bow will break there. So we are going to make it thicker, but we also need a smooth transition to the limbs.
Start by cutting the saved 25 inch piece to 9 inches. Now using your table saw carefully feed the piece back an forth across the blade while raising the blade in small increments. the feather edge should be tangent with the highest point on the blade. you can make a simple sliding jig to ease the process, I didn't, but would recommend it. Also I used a 7 inch blade, a 10 inch would have made nicer fades.
Don't worry about getting a perfect paper thin edge, but get close, now you can glue the handle piece to the bow and let it dry at least 24 hours, and then cut out the handle.
Right now you have a bow shaped object, and you have to start working it into a bow. Start by easing all the corners, this will help prevent "lifting a splinter" when you start flexing the bow. After that, cut a couple of thin wedges from scrap and lash then one inch from either end of the limbs.
Now make a heavy long string from some cord and we can start working the bow
Here's where it really get's scary, we are gong to start bending the bow to get a smooth curve. We need a tillering stick, i just took a 3 foot piece of 2x4 and cut slots every inch, suboptimal, but workable.
So put the bow on the stick and start pulling it back, you want a smooth even curve, you can see my outer limbs are too stiff, so I'll scrape the belly (string) side to thin them. Keep working until you have a tiller you're happy with.
If at ANYTIME you hear cracking, STOP, get a new piece of wood and go back to step one.
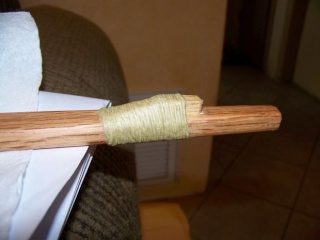
I liked the nock wedges over cut nocks on narrow limbs like these, so being chicken, I spot glued the nocks an inch and a quarter from each end, lashed with hemp twine and soaked with titebond glue. and they still moved when I first strung the bow!!! Fortunately just a 1/16 and symmetrically so I didn;t have to fix it, but that gives you an idea of the forces involved here.
After finish sanding I coated the whole thing with a wax finish I use on my firearms called variously "gunny paste" "one third finish" etc. a mix of BLO, beeswax and turpentine. Finally, you can wrap the handle with hemp twine, but I like the bare wood

Nick- Admin
- Posts : 25
Join date : 2015-03-26
Age : 35
Location : Tuckahoe, Va -

Page 1 of 1
Permissions in this forum:
You cannot reply to topics in this forum|
|
|